This video shows a smal demonstration of an old Repeater Reader version (has to be updated later)
Support only Via Telegram Messenger
https://t.me/joinchat/AAAAAAxNhRTzHDCfKpMxLQ
You can Download the Telegram Messenger here:
https://telegram.org/
You agree that you use this program at your own risk !
Do you like RepeaterReader ? Send a small Donation
** Download RepeaterReader.jar **
last Version: 20240612T103700 (Manual is not yet updated)
Old Versions (dont use anymore):
** Repeater Reader – 20240606T232500 **
** Repeater Reader – 20240606T200000 **
** Repeater Reader – 20221113T165600 **
** Repeater Reader – 20220929T112000 **
** Repeater Reader – 20190512T220700 **
** Repeater Reader – 20180516T112900 **
** Repeater Reader – 20180516T072000 **
** Repeater Reader – 20180309T101100 **
** Repeater Reader – 20180129T053800 **
** Repeater Reader – 20180117T141500 **
** Repeater Reader – 20180109T103300 **
** Repeater Reader – 20170711T180100 **
What is Repeater Reader ?
Repeater Reader is a small JAVA program which „simulates“ the traffic on a selected repeater. RepeaterReader is not able to read the repeater itself or the data stream to the selected repeater.
The program is using the Brandmeister „APIs“ for the Last Heard and GPS system similar to the Brandmeister website:
https://brandmeister.network/
In other words, its using the same data source, the BM network (BM MQTT) but its not the same system, so if you see the website is working and RepeaterReader not its no indication that there is something wrong in the BM system.
RR (RepeaterReader) reads the data stream of both „streams“ and filter out all necessary data like the selected Talkgroups or the connected Reflector. From the technical point of view all the messages are MQTT messages in different topics.
But why do I need RR ? You don’t need it 😉 I designed the program to see the traffic on the repeater even if the TRX is turned of like if you are at work.
RR has a sound notification (not the voice, only a sound) for all traffic or only for friends so you can let run it in the background. You can also minimize the program (ESC key) and let it stay on top (if configured) in a corner of your monitor.
For multimedia freaks: a KODI option is also included to send messages to KODI. So you can watch your movies and get the notification on the big screen . If you don’t know what KODI is just ignore this option 😉
There is an extended log feature and a Chart feature, also a an option to send messages to telegram and a Web API to monitor the „trafic“ on your homepage:
or on your mobile phone
http://live.do0jg.de/
What are the system requirements ?
The program is written in JAVA so it should run on all supported systems like Windows, Linux or MAC
You need the newest JAVA 8 version
https://java.com/download/
Currently this is Version 8 Update 211
Make sure (during the installation of JAVA) that you only install JAVA (expert mode if available) because sometimes they want to install other software. (as far as I know)
If Repeater Reader is not starting or unable to connect de-install Java and perform a new installation.
Don’t extract the JAR file.
Is there any support available ?
Support via Telegram Messenger (English)
https://t.me/joinchat/AAAAAAxNhRTzHDCfKpMxLQ
You can download Telegram Messenger here:
https://telegram.org/
Support via Facebook (English)
https://www.facebook.com/groups/RepeaterReader/
Is there a Yahoo Group ?
– No, I don’t like Yahoo Groups
Is there Email support ?
– Yes but only if you send me a free Motorola DM4601e 😀
– OK with other words, there is no email support available, please use Facebook or Telegram
Is there forum support available ?
– currently not, maybe later
What’s about telephone support ?
– Dude there is no telephone support 😉
Manual (RTFM or Not RTFM)
The Display(s)
RR has 2 Displays, the left one is for TS1 and the right one is for TS2

On the top, there is the indicator for the Timeslot TS1 / TS2
![]()
This indicator changes the background color
– grey background –> Standby or receiving
– red background –> TX on the selected repeater
– orange –> HangTime indicator (5 seconds)
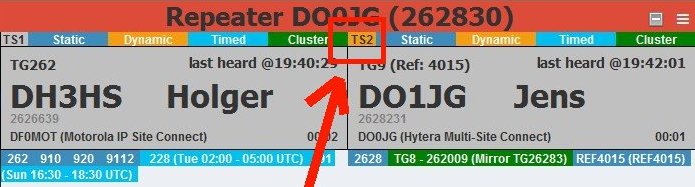
On the image above (orange indicator) you can see that the (simulated) HangTime is active.
On the image above (red indicator) you can see that someone is transmitting on the connected repeater.
Right after the indicator there you can find 4 coloured labels for
– Static Talkgroups
– Dynamic Talkgroups
– Timed Talkgroups
– Cluster
You can click on each label to disable these Talkgroups in RR, click again on the label to enable it again.
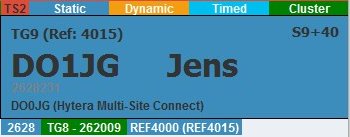
![]()
On the image above you can see that Dynamic, Timed and Cluster are deactivated.
Of course it is only deactivated in RR, not on the repeater 😉
The rest of the display should be self explaining
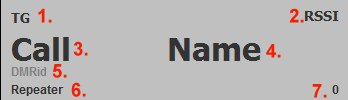
1. Talkgroup (Reflector)
2. Signal Strength (calculated from the RSSI)
–> changes to „last heard @HH:MM:SS“ after PTT was released
3. Callsign (transmitting station)
4. Name (transmitting station)
5. DMRid (transmitting station)
6. Callsign + Type of Repeater / Hotspot
7. Transmission Timer (MM:SS)
Below the display you can find the currently to the repeater connected Talkgroups. The background colour indicates the kind of the TG like on the labels above the display.
![]()
For the Times TGs you can find also the activation time in UTC. For the cluster you can find the Mirror TG in brackets. (if available)
The next part of RR is the repeater info part located below the TGs
![]()
This should be self explaining.
The last Updated filed indicates the last time were the Brandmeister System updated this information !!! AND !!! Repeater Reader read this information from the Brandmeister Network.
The blue text on the right side indicates links. The first two links are links to Google Maps and the last two links are links to the Brandmeister website.
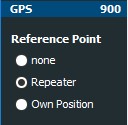
Below the info part you will find the GPS Logging
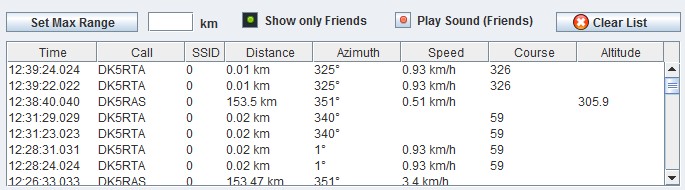
Set Max Range (km)
Here you can define the range (in km) for the GPS messages related to a reference point.

- none –> Reference Mode (Max Range) is turned off, you will see the LAT LONG coorinates instead of range and azimuth
- Repeater –> this will use the repeater coordinates (if available)
- Own Position –> you have to configure your position in the settings
If you change this option after you received reports, these change has no affect to the received reports. If you want to see the changes you have to open the extended log.
Insert a valid integer (only a number without point) and click on the „Set Max Range“ button.
Checkbox „Show only Friends“ will hide all other GPS messages except position reports from your friends. (you have to create your friend list in the settings)
Checkbox „Play Sound (Friends)“ this will play a sound every time you receive a GPS report from a friend (you have to create your friend list in the settings)
Button „Clear List“ click on this button to clear the GPS Reports in the table below (will not clear the reports in the extended log)
The table with the reports should be self-explaining because the columns are named. The only thing to mention is that the „Distance“ column is used for the LAT value and the „Azimuth“ column is used for the LONG value in no reference point is selected.
Below the GPS part you can find the 3-line Log
![]()
here you can find all program related information and the „QSO Log“.
There are 3 buttons:
- View Chart – to open the Chart Window
- Extended Log – to open the Extended Log Window
- Clear Log List – to clear the 3 line log
You can also click on the 3-line Log to open the „Extended Log“
On the left side on the top there you can find the controls for the Repeater Monitor.

In the Drop Down menu you can select the repeater you want to monitor. Before you can use this option you have to set up your repeater in the setting (will be explained later in this manual)
For testing purpose the repeater DO0JG is already in the list.
On the right side of the drop down menu there is a blue bullet with a white arrow, with this button you can refresh the repeater information manual. This can be useful if Repeater Reader did not recognized a change (e.g. a dynamic TG expired)
Below the drop down menu you can find the Start/Stop options and the message counter. If you start Repeater Reader (and the automatic start is disabled) the buttons locks at follows
![]()
The left button is the START button, the right button is the STOP button, the numbers on the right are the message counter for the „Last Heard Stream“.
With a click on the left button you start the repeater monitoring. If you click again on this button you can restart the repeater monitoring.
As soon as you clicked on the start button both buttons will change the design.
![]()
To stop the repeater monitoring you have to click on the stop button. The design of the buttons will change back to the design before.
![]()
Below the Start/Stop buttons you can find the „Alert Sound Options“
![]()
click on the + to expand/show the menu.
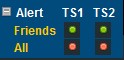
here you can select if Repeater Reader shall play a sound every time a friend (or all user) start a QSO an the selected time slot.
In the screenshot above a sound will be played every time id a friend is transmitting on TS1 and TS2.
– green bullet = a sound will be played
– red bullet = NO sound will be played
Below you can find the Global Last Heard List

It shows all QSOs (Group Calls on routable TGs) world wide with a length of >= 5 seconds. This can be useful to find a QSO. There are no further options availabe for this part of RR.
The next options on the left side are the options for the GPS Monitoring. The options for the Reference Point were already explained above in this manual.
The number (900) on the right side shows the received GPS Position reports. In an old version of RR there was an option to Start/Stop the GPS monitoring. I combined this option with the „normal“ Start/Stop option.
The next options are for the Telegram Server
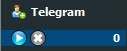
To open the settings for the Telegram Support you have to click on the word „Telegram„. You will find the manual for these setting below in this manual.
Again you can find the standard Start/Stop/Counter.
In this case you can start the Telegram Server. This is not really a server, its the function to enable some remote control functions for Repeater Reader. If you don’t use Telegram don’t start the Telegram Server. Also if you don’t want to use the remote control function.
Below the Telegram Options you can find the „Traffic Counter“
![]()
On the left side of the „Traffic Counter“ there is a small icon labelled with a 192. If you click on this icon you can access the options for the „Web-Api„.
There are 2 options to use this function.
You can use the API from the „Repeater Reader Web Service“ or you can use an own API. To use an own API you need to be familiar with PHP, HTML and MySQL and you need webspace with PHP and MySQL support. If your hoster blocks POST request from outside your webspace you can not use this feature. You will find the manual for these setting below in this manual.
General Settings
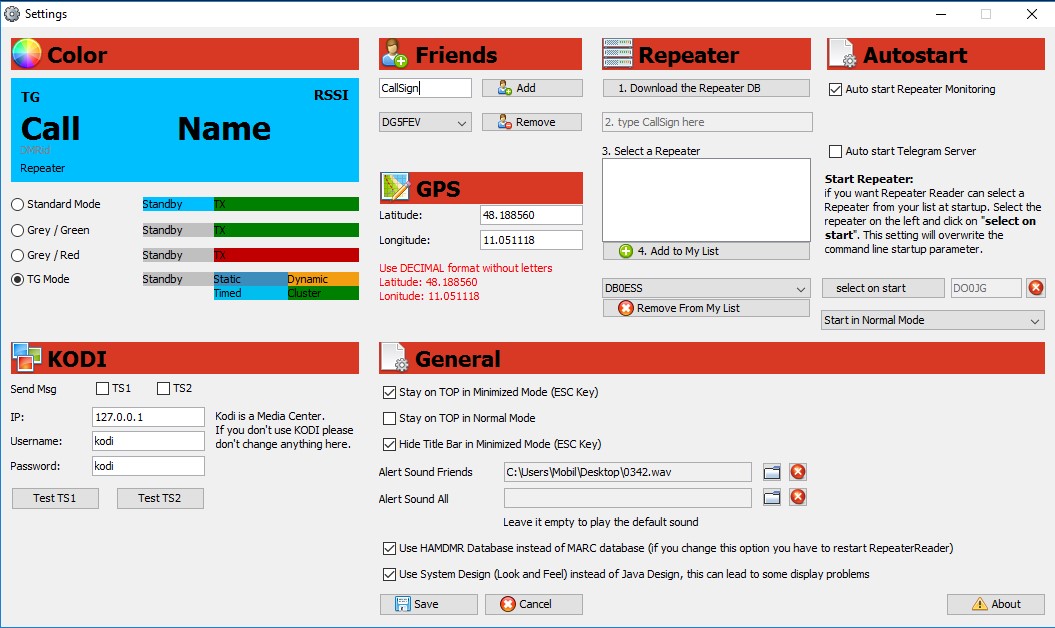
Color
Here you can define the design of the display. You have 4 different options (color schemes) Move your mouse over the coloured label to see a preview in the simulated display. I recommend to use the „TG-Mode“
Friends
If you want to use the Friends Feature you have to put in the Callsigns of your friends in you friends list
To add a friend to the list just write the Callsign in the text field (delete the word CallSign before from the input field) and click on Add Button.
To remove a friend from the list select the Callsign in the drop down box and click on the Remove Button.
Repeater
To use Repeater Reader you have to add a repeater. After downloading Repeater Reader one repeater (DO0JG) is already in the list. If you remove all repeater this repeater will be added automatically again.
You can add as much repeater to your list as you want but you can monitor only one.
To add a repeater follow the numbered steps
- click on the button „1. Download the Repeater DB„
- remove the text „2. type your CallSign here“ and insert the CallSign of your repeater, while typing the box below will be filled automatically
- select your repeater from the search results below „3. Select a Repeater„
- click on the button „4. Add to My List„, the selected repeater will be added to the drop down below the mentioned button
To remove a repeater from the list
- select the repeater in the drop down
- click on the button „Remove from My List„
Autostart
Here you can define what happened when Repeater Reader is starting.
Auto start Repeater Monitoring
select this checkbox if you want that Repeater Reader starts the monitoring of the selected repeater after the program starts. If you have more than one repeater in your list and the monitored repeater is not on the top you have to select a start repeater (see below)
Auto start GPS Monitoring
select this checkbox if you want that Repeater Reader starts the GPS monitoring after the program starts.This was an old option, its now combined with the „Auto start Repeater Monitoring“
Auto start Telegram Server
select this checkbox if you want that Repeater Reader starts the Telegram „Server“ after the program starts. Don’t select this box if the Telegram Server is not configured correctly.
Start Repeater
If you want that Repeater Reader select a repeater from your list after the program starts you can select this repeater in the drop down and click afterwards an the button „select on start„, the CallSign of the selected repeater will be inserted in the field right of this button.
To remove the „Start Repeater“ click on the X right of this field.
Keep in mind that this option will overwrite the command line start parameter (if used)
Start Mode – Drop Down
in this drop down you can select how Repeater Reader is starting, here you have 3 different options
- Start in Normal Mode
- Start in Hide GPS Mode
- Start in Minimized Mode (ESC Key)
GPS
Here you can define you own / current position.
This position will be used for the GPS reference point.
If you don’t want to use this feature it is not necessary to insert your position, if you insert your LAT LONG position you have to use the decimal format like:
Latitude: 48.188560
Longitude: 11.051118
KODI
KODI is a free Media Center and you can download it here:
https://kodi.tv/
If you don’t use KODI or if you are not familiar with KODI don’t activate this feature.
If you are a KODI user you can configure the log in data here.
If you select the checkboxes for TS1 and/or TS2 Repeater Reader will send a message (for the selected time slot) to KODI every time an OM starts a QSO.
General
Here you can find miscellaneous options which are not related to the other categories.
Stay on TOP in Minimized Mode (ESC Key)
If you select this option and changes with the ESC key (in the main window) in the Minimized Mode, Repeater Reader will stay on TOP. This means Repeater Reader will not be hidden by other (normal) programs.
Stay on TOP in Normal Mode
If you select this option (in the main window), Repeater Reader will stay on TOP. This means Repeater Reader will not be hidden by other (normal) programs.
Hide Title Bar in Minimized Mode
If you select this option no Title Bar is visible if Repeater Reader is in Minimized Mode.
Alert Sound Friends / All
Here you can select an own wav file (only wav is supported) for the sound notifications.
Click on the folder icon to select a wav file or click on the X icon to reset the sound notification to the default sound.
Use https connections for the streams
If you are behind a proxy and the Last Heard and / or GPS packets are not coming in (counter is not increasing) activate this optionThis was an old option, it was removed with the change to MQTT
Use HAMDMR Database instead of MARC database
The HAMDMR or MARC database will be used to display the CallSigns / Names in the display. Here you can select wich database you want to use. For German Guys it could be helpful to use the HAMDMR database.
Use System Design (Look and Feel) instead of Java Design
If you don’t like the Java Design you can try to use user System Design if you select this checkbox.
Keep in mind that this can lead to some small (or in the worst case big/crazy) design problems.
Chart View
If you click on the button „View Chart“ RR will open a new window with a chart. On the top left you can insert the TG you want to monitor. Just insert the TG and click on the Start button.

If there is already some data in the log, RR will display up to 15 minutes historical data.
If you want to monitor another TG, just insert the new TG in the field and click on Start.
To change the Tine Line (domain axis) just select the radio button of your choise.
You can also zoom in, click and hold the left mouse button (on the top left corner of the area you want to zooom in) and move the mouse to the right corner on the bottom. Release the mouse button.
To zoom out, click with the left mouse button on the chart and hold the left mouse button, than move the mouse to the left and release the left mouse button.
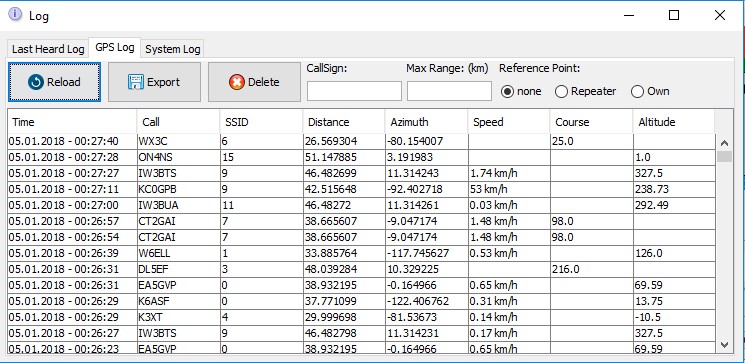
Extended Log
I think this should be self explaining. 😉
For the Last Heard and GPS log, there is an option to export (to CSV) the Log as shown on the monitor. This means, if you activate a filter like to show only TG262, the export function will only export taransmissions on TG262.
This Export feature can be handy if you want to analyse the traffic on your local repeater or to collect your own GPS reports.
Currently there is no Auto Update of the Log, you have to click on the Reload Button if you want to update the data shown screen. The export feature will always use the latest data.
The Log will be permanently cleared if you close RR.


Telegram Settings
Tab – Basic Setup
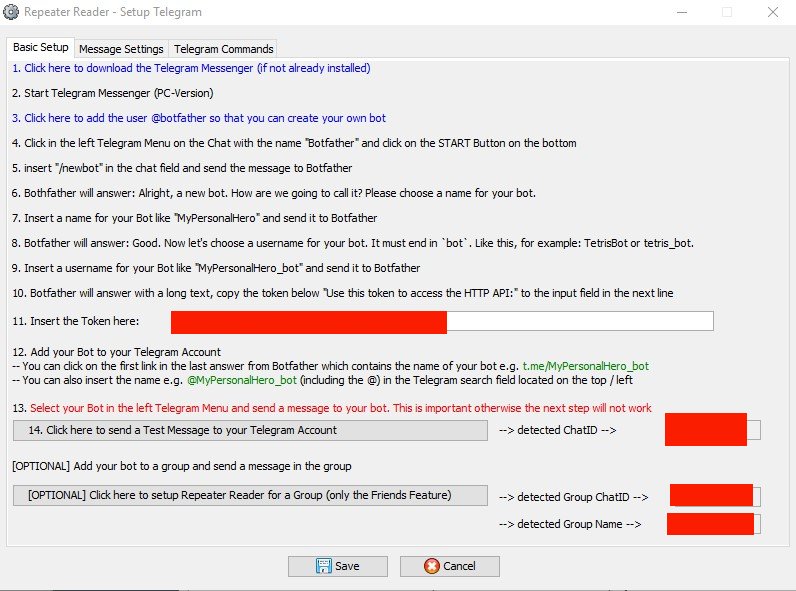
The Basic Setup should be self explaining because everything is explained on this tab. Just open this tab in Repeater Reader and follow the steps.
Tab – Message Settings
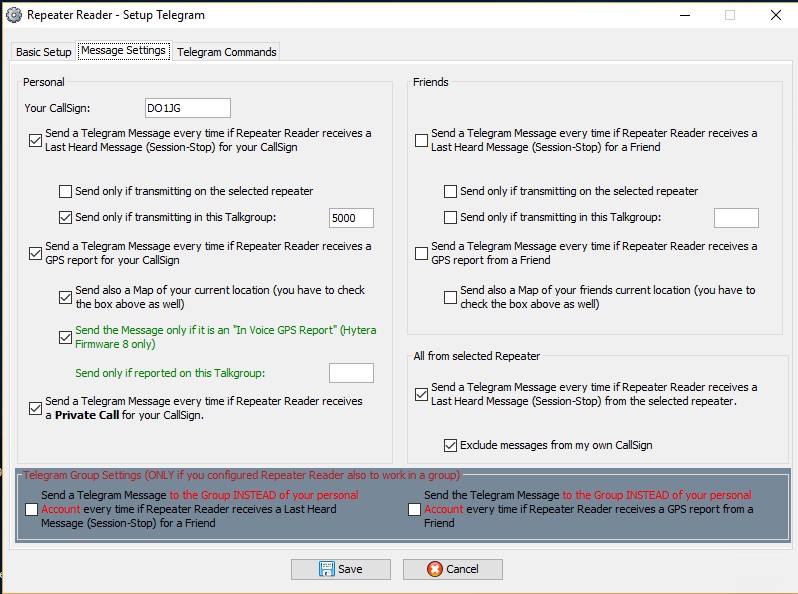
This tab has different parts: Personal, Friends, All from selected repeater and Group Settings
Some of the checkboxes are AND and some are OR conditions so you have to read the text carefully. 😉
The „Personal Box“ is only for messages to your private Telegram Bot-Chat.
The „Friends Box“ is normally also for messages to your private chat but can be redirected to a „Group Chat“ (if configured on the first tab) if you select the checkboxes in the „Telegram Group Settings Box„.
Tab – Telegram Commands
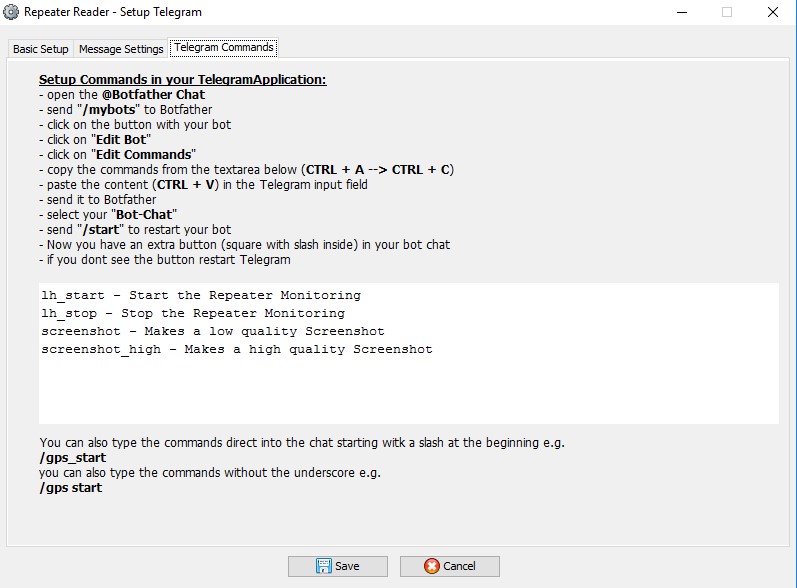
This tab has no options, it contains only the instructions and everything is explained in the tab.
Web Api – Settings
The Web API settings are seperated on 5 tabs.
Tab1: the Auto API
Tab2: here you can activate the API Feature (Auto API and Own API)
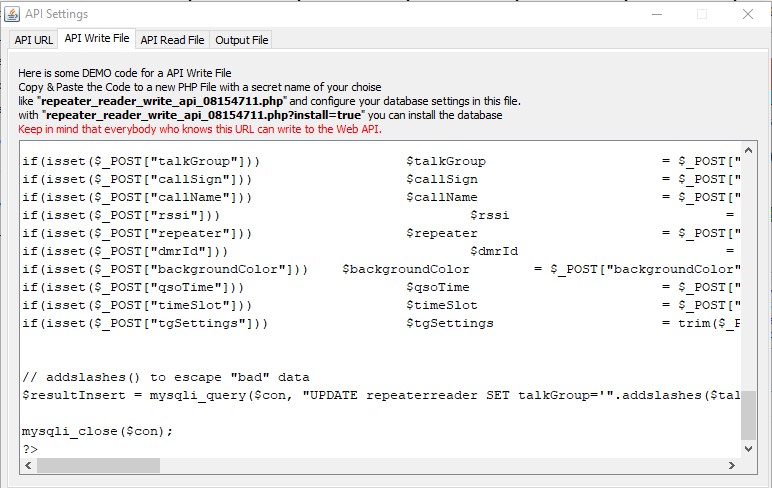
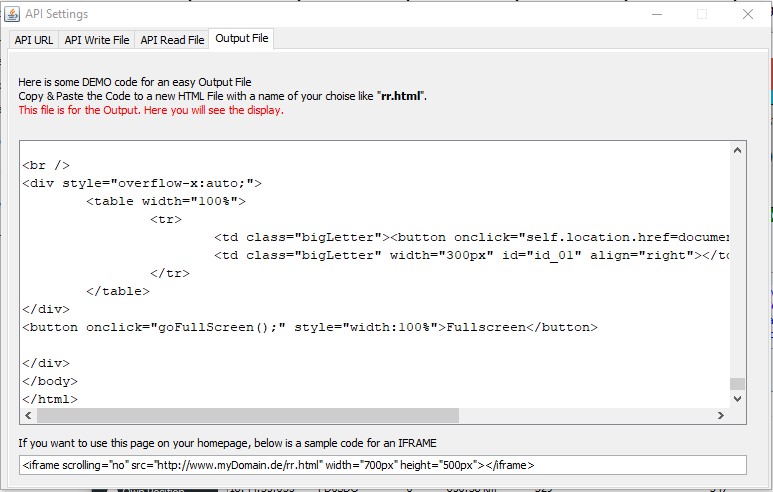
Tab3-5: here you can find some demo code if you use the own API
If you are not a programmer, only Tab 1 and 2 should be interesting for you. I will not give any support (like install it for you) for the lower options on tab 2 and all the code on Tab 3-5.
Since there is the Auto API it should be as easy as pie to get it working.
How ever, if you dont want to use this feature on your homepage or on your mobile phone, please dont activate the feature. There is no need to activate it just for fun 😉
If you open the Web API settings the first time, you will see this page
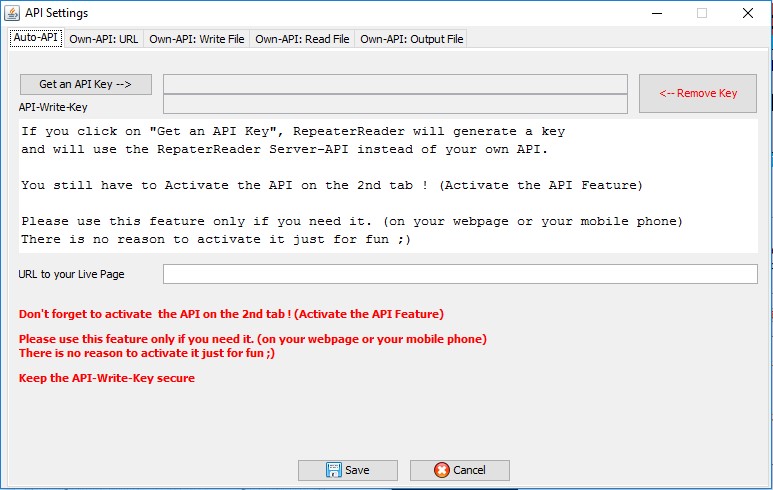
Auto-API
How does it work ?
– Click on „Get an API Key“
![]()
This will generate 2 Keys, in the second line you will see the API-Write-Key, keep this key secure, also don’t post it in the support groups.
Below the TextArea you will find the (cryptic) URL to your „Live Page“
![]()
http://www.do1jg.de/service/repeaterreader.php?rr=26199844-a415-41ba-b09e-e06136437996
This URL includes your Read Key, you can share this link with your friends and put it on your homepage.
Maybe later in 2018 I will change the URL to a bedder one, so keep monitoring the Telegram Group to be informed. If I change the URL you have to generate an new key.
Now click on „Save“ to save the Keys to your configuration file, if you click on Cancel RR wil lnot save the Keys and you have to start again.
If you forget to copy your link, you can open the Web API Settings window again.
As next step you have to activate the API on Tab 2
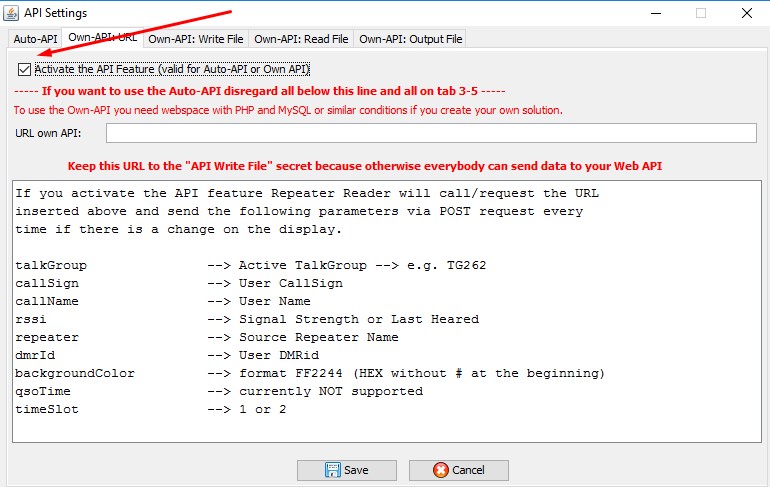
Just check the box and click on „Save“ Here you can also deactivate the API later on if you dont want to use it anymore.
Thats all.
Hint: if you want to use your live Page in an I-Frame on your homepage, you can use this code:
<iframe src=“http://www.do1jg.de/service/repeaterreader.php?rr=26199844-a415-41ba-b09e-e06136437996″ width=“700px“ height=“515px“ scrolling=“no“></iframe>
Just replace the URL
http://www.do1jg.de/service/repeaterreader.php?rr=26199844-a415-41ba-b09e-e06136437996
with your own URL
Below you can find the screenshots for Tab 3-5

Changelog
New in Version 20180109T103300
Bugfixes
– MirrorTG was not detected correctly
– Add Friend Problem solved
– problem with the RSSI message (Telegram) solved
– minior bug fixes
Changed / Removed
– „Start GPS Monitoring“ Button removed, now you have only 1 button to start both monitorings (the auto start options under settings are stell there but not functional)
– Garbage Collector increased to 120 seconds (from 60 seconds)
– Option: AutoStart GPS Monitoring removed (not needed anymore)
– Option: use https for streams removed (not needed anymore)
The same for the http/https option
New Features
– The main changes are in the background
–> the transport „protocol“ was changed
–> RepeaterReader uses now an own server instead of the „BM last heared server“
– GPS „set max range“, „show only friends“, „Play sound“ and the „reference point“ (on the main page) will be saved if you close RR
– improved Extended Log
–> change of the time format in the logs
–> button the clear the Log List on the main Window (only this list)
–> button to open the extended log (click on the 3 line log still works as before)
–> in the extended log you can clear each part of the log
–> Last Heard Log –> added TG field
–> Export Function for Last Heard and GPS log (e.g. if you want to collect your own GPS positions or to analyse the traffic on your repeater)
– New: Global LastHeard List
–> displays all already finished calls (5 seconds or longer)
–> locals calls (TG9 without Reflector), calls to a TG > 99999, calls in TG2/8 will not appear in this list
– Chart View
–> In the Chart Window, insert the TG you want to monitor in the Textfield (top left) and click on „Start“. If you want to change the monitored TG, insert the new TG in the Textfield and click on Start.
–> If there are already trasmissions on this TG in the log, it will be shown in the chart (max 15 minutes historical data, maybe increated in the next version)
–> The Chart is updating every second.
–> It can happen that very short transmissions ( <= 1 second) are not visible on the chart (if the transmission starts and stop at the same second) this is due to the Chart libary I use, the smallest unit is 1 second.
– RR has now an additionaly Web-API via the RR Server, its „as easy as pie“
–> Please use this feature only if you need it. (on you homepage, on your mobile phone and NOT because you can activate it ^^)
New in version 20180117T141500
New:
– Telegram: add Private Call detection
New in version 20180129T053800
New:
– I changed the Server Adress, you have to use the new version.
New in version 20180516T072000
New:
– Bug Fixes and some improvements I forgot ^^.
New in version 20180516T112900
– Bug Fix for Cluster
New in version 20190512T220700
– Bug Fix for Cluster
New in version 20240606T200000
– Bug Fix for Disconnects
– There are still some issues with missing call signs, I am aware of this
New in version 20240606T232500
– Bug Fix for missing call signs and SSIDs
New in version 20240612T103700
– SysOp function changed to API2 (only API2 keys are working)
– Global LastHeard is working again
– Reflector Info / Settings removed
– Problem with Session-Stop detection solved
– Fixed TG9 local call detection
– fixed link for „Last Heard List for Repeater“